|
NAKAMICHI CM300 MICROPHONE
HISTORY and COMMENTS
|
The Nak CM-300 was sought-after mic of the period. Instead of a single pattern the capsule on the tip was interchangable There were four: a CP-1 cardioid, CP-2 omni, CP-3 pinpoint omni, or CP-4 super-directional shotgun. I bought a pair of CM-300s which came with CP-1, CP-2, and CP-4 shotguns. My invoice lists the mics as CM-300S. The Nakamichi literature of the period recommended a three-mic setup: two on the source with a third farther back in the room to capture ambiance to be combined with their MX-100 mixer. Incidentally, the CM-300 and physically identical TEAC ME-120 and Tascam PE-120 are said to have all been manufactured by the Japanese company Primo.
Since 1993 I used them a few times to record myself on acoustic guitar with the CP-1 capsule but that was about it. Recently I decided to dig everything out of storage including the CP-4s which had never been out of the box. The wind socks were distintegrating but the CP-4s were pristine.
I started doing some reading on how to use a shotgun mic. I was surprised to read that they are not meant for sources beyond several feet and do not provide any "zoom in" ability to capture distant subjects. With a narrow frequency response they aren't even meant for music. Instead, they are designed to reject surrounding noise to help capture dialogue in interviews. Wow! I had always assumed that a shotgun mic was the correct choice for recording bands from the audience since so many tapers used them. I then thought back to the bootlegs I have heard using shotguns and remembered how they were hollow and boomy. No offense to those who spent so much time taping shows with shotgun mikes but they don't appear to have been the proper choice.
 |
|
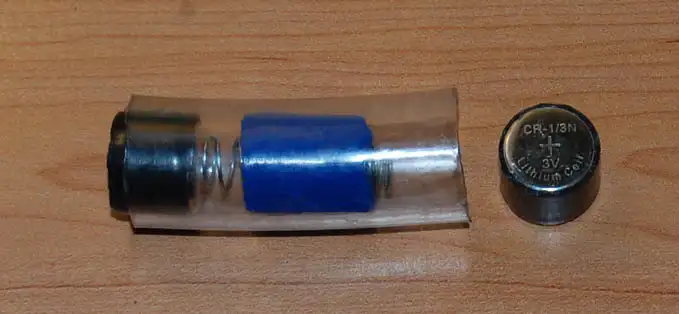
THE EXTINCT BATTERY For my CM-300s I use three "CR-1/3N" batteries. These 3V lithium-ion cell batteries are far superior to the old mercury/lead acid types and together produce about 9.3V which is what this mic is spec'd for. The batteries' OD is smaller than the mic's so I went to the hardware store and bought some clear flexible tubing the ID of the mic. I wrapped the batteries with a few turns of electrical tape to fit the inside of the tube. I used a spring between them to pass the voltage. So this method looks strange and isn't very elegant but it worked for me. |
 |
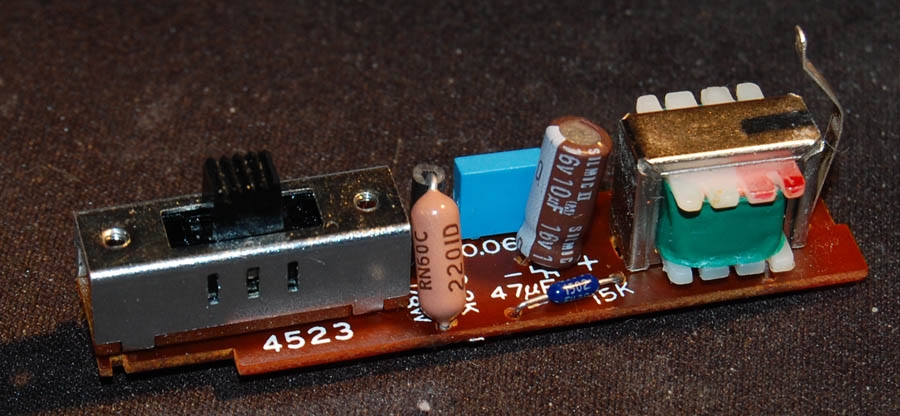
CIRCUIT MODS I changed the two original carbon 5% resistors to 1% Dale CMF metal films to take advantage of their very low noise. The .068 mylar became an Epcos MKT of Polyethylene Terephthalate (PET). Because of limited space for the 10uf coupling cap there was only one choice: a modern audio-quality electrolytic. I decided to use a 10uf/16V Elna Silmic II. To my ears Silmics provide an open, dynamically textured sound which I find musical. Interestingly I find Silmics can sound slightly soft at first but after several hours of use they suddenly open up; one of the few times I've heard an audible break-in of a board component. Low quality caps can have a bright sound which is misleading. This brighter glaze may sound clean at first but produces flatter, less realistic dynamics to my ears. |
|

ABOVE: Notice the small ground tab behind the mini-transformer. This grounds to the inside of the mic body, so I used contact
enhancer on the tab as well as on the inside of the mic body. I also sprayed out the power switch with contact cleaner and reflowed the solder on the XLR connections. |
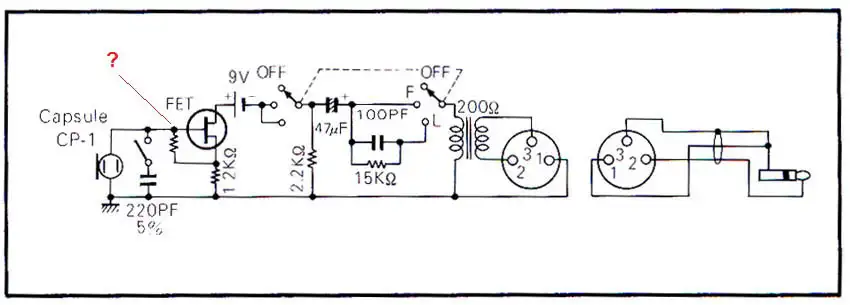 Shown above is the schematic from the CM-300 manual that shipped with my mic. The red resistor question mark for the FET was added by me. Why Nak printed incorrect parts values in their manual is a mystery. |
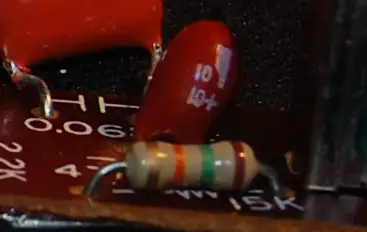
BELOW: To get inside the capsule body remove the C-clip from the bottom and press down on the brass pickup to push the plastic insert out the bottom. Once out the insert snaps apart. Just as before the values inside were wrong compared to the schematic: the 1.2K resistor was a 2.2K which I replaced with a Dale CMF. Next to the FET is a mysterious resistor not labeled in the schematic: Brown-Black-Violet calculates as 100M ohm which makes it a bias resistor to pass DC to the FET. The FET is a tiny 2SK118 transistor listed for "General Purpose and Impedance Converter and Condenser Microphone Applications". This FET may have been hand-selected originally and modern day replacements are scarce and questionable so I left it in place. Hard to see but Nak connected the 100M resistor to one leg of the FET using a shared solder joint in the center of the board. This is a bad practice as critical parts touching the board can introduce noise into the circuit. Air is the perfect dielectric. So when I replaced the 100M ohm resistor with a 1% MOX200F100 resistor (not shown) I bent up the FET lead in mid air and soldered the new resistor to it.
|
 |
RESULTS Using the same preamp, headphones, batteries, and levels from before the mod I was flat out astonished when I powered the Naks back up. Before I had to get reasonably close to the microphones to pickup a clear signal, they had a dull, closed-in sound. To be honest I had never been too impressed. Now, the noise floor floor is vanishingly silent, with an articulate, spacious sound. I can hear creaks in the room, someone walking in another part of the house, my whispered breath, my computer fan, actual room ambiance. Switching the low cut filter on didn't diminish the magic. I never expected such a difference from 3 Dale resistors and a Silmic. I can only conclude that the original tantalum was pretty horrific and that the original carbon film resistors were poor sonic choices. Isolating the FET from the circuit board may also have lowered the overall noise levels. Take note. |
 |
Datsunzgarage.us © 1997-2026
All mods are illustrative only, perform at your own risk.
Datsun is a registered trademark of Nissan®