|
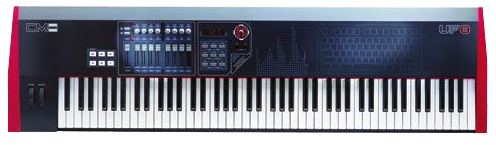
CME UF8 KEYBOARD
HISTORY and COMMENTS
|
My town holds a 'bulk trash month' twice a year. During this time people are allowed to put old junk on their curb for disposal like mattresses, tables, housewares, etc. So imagine my surprise when I drove past a house and saw mixed in with a pile of old chairs: a large keyboard. Intrigued I pulled over and put the heavy and unfamiliar model in my trunk.
Once home I began to clean it up, it was in excellent shape with no scratches and was covered in old dust and dirt as though it had been in a garage for years. I went online and found it was 10 years old and that this stylish 88-key was the flagship midi controller model made by the company CME around 2006. It had great reviews and was their only model with fully-weighted piano action, velocity settings, and a nice "aftertouch" feature.
 |
CME doesn't support this board anymore and the latest USB driver was written for XP meaning that USB use with Windows 10 is not an option. But because this board is a true midi with a 5-pin midi output who needs the lack of USB support? Considering I got this for free makes this really great project...a couple of hundred little parts forming a giant jigsaw puzzle and when optimized produces beautiful music.
KEY REPAIR
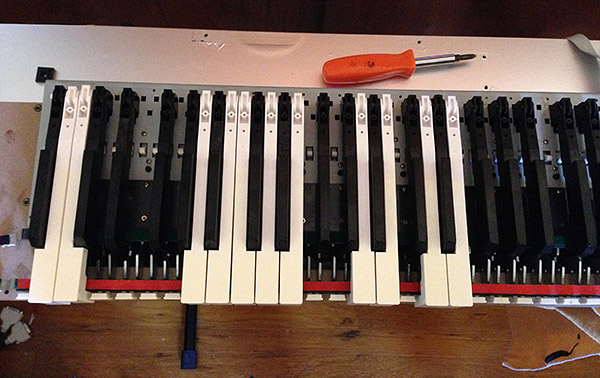
Despite the UF8's scarcity there are several good tutorials online about fixing common problems. The main issue is that with age keys can stick down or not return to rest properly. I was lucky that I had only one black key that was affected, but that's one too many. So I began to take the keyboard apart.
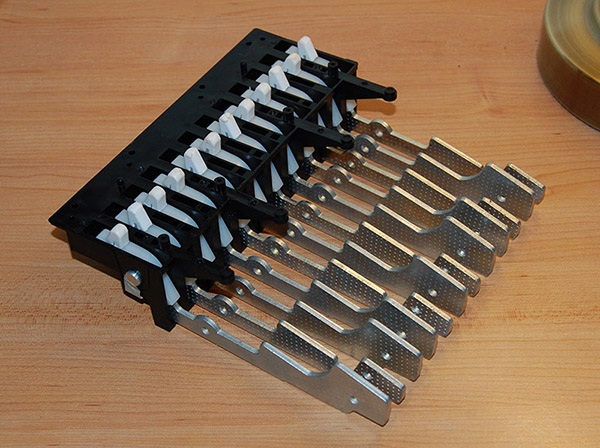
Its essentially 8 modules of keys that can be removed individually.
I suggest watching the video tutorials online to see how to remove the modules.
There are about 300 small screws holding all the modules, I put mine in a bowl to save. For replacements I went to the hardware store and bought #6 1/4" and 1/2" in length in stainless steel.
I took several photos before I begun since the internals looked so unusual.
THE STICKING KEY CAUSE: A smooth aluminum rod runs down the length of each module and passes through a plastic bushing in each weighted hammer.
The bushings deform over the years, increasing drag on the rod. CME doesn't sell new hammers but these are easy to repair.
Note below that each black/white key has its own respective hammer shape to weight them differently. The two hammer shapes are identical so no worries about mixing these up, as long as the correct hammer shape remains in the right slot. This is where taking photos is important.
 |
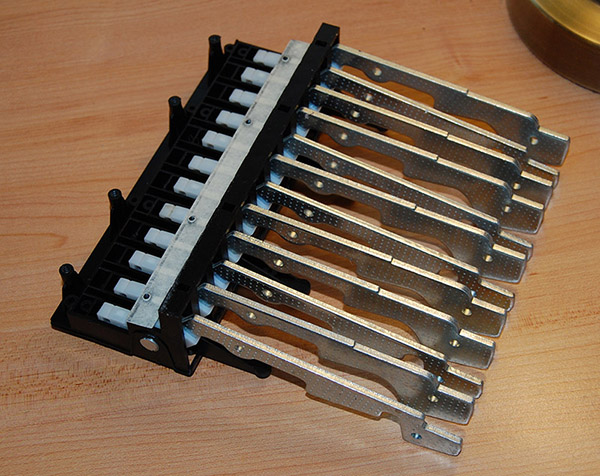
Below is the bottom view of the module. A thin strip of masking tape ran down the edge. This serves as a gasket between the two circuit boards that run the length of the unit. I replaced them with a strip of blue painters tape cut to size.
 |
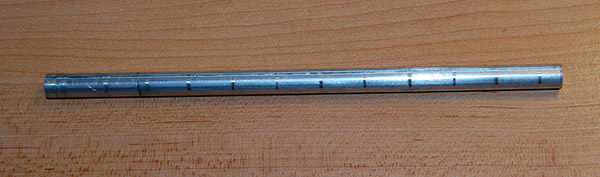
BELOW: The rod easily presses out of the module using a screwdriver. Made out of aluminum it shows light marks from each hammer and has a shallow groove machined the length of each side. Instead of a scotchbrite pad or paper towel I used a ball of soft cotton "wadding polish" from the auto store to polish the rod to a mirror sheen. After the wadding I used a microfiber towel to produce the perfect finish.
 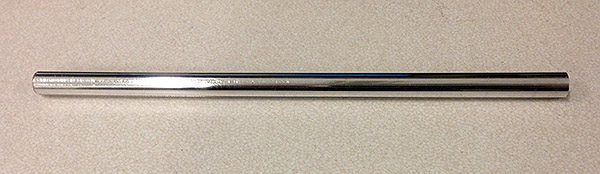 |
So I was pleased to find that the smooth-end of a 5/16" drill bit fits exactly into the bore and the leading edge re-forms the hole. I pushed it through several times from both sides. NOTE: make sure the bit has a sharp leading edge, not beveled, so it will cut. The result was a hammer with a perfectly round hole in factory dimensions that rotated smoothly on the aluminum rod. I did this on all my hammers but still had a couple that resisted this treatment, so I twisted a the fluted part of a new 5/16" bit though by hand. I could feel it cutting slightly and saw some small white shavings emerge. On installation the action was now smooth. So either method will work depending on your severity of binding.
 |
KEYS CLUNKING
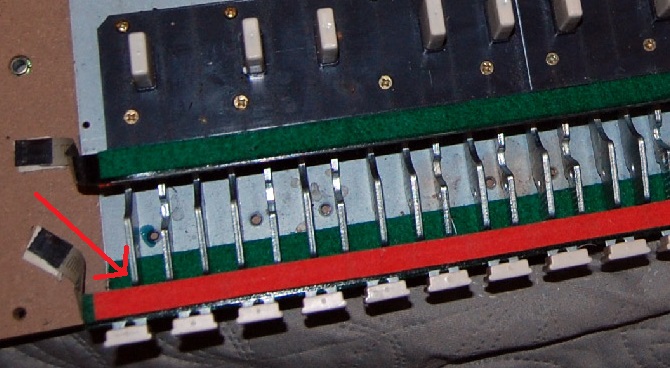
Some have reported clunking from the keyboard action at times. One cause is the 5/8" wide, 1/4" thick strip of green felt known as a
"hammer rail cloth" which dampens the hammer tip as it returns to rest. On mine the hammers had slightly cut into the green felt in places allowing some to come within a mm of the bottom metal plate, which would explain why energetic playing would cause the hammers to thunk.
 |
NOTE: If the ends are lower than parallel to the bottom plate it adds extra weight to the key action. By adding a layer of felt it brought their heights back up. I also added a long strip of sound dampening tape to the back plate under the hammers to dampen any resonances.
NOTE: be careful not to disturb the red/green felt shown on the right. This contains the sensor for each key and is probably not repairable if you break it.
 |
LUBRICATION
The factory used what appeared to be silicone oil on the rod and hammer bushings and silicone grease on the hammer "hat" and contact points. For replacements I had to be careful as lubricants such as graphite, moly, oil-based greases and even some silicones and white lithium greases can damage plastic parts. This means no aromatic 'rust busters' or automotive lubes.
For the plastic hammer bushings/rod I used CRC 2-26 precision spray lubricant which is an electrical-grade lubricating oil and is plastic-safe. NOTE: CRC also makes a heavy-duty silicone which is listed as not safe for plastics...which reveals the difficulty in choosing the correct oil. I lubed the entire rod and its channels as well as the hammer bushings (the sides included).
When it came to the grease every versions I found was intended for plumbing or car repair and I had concerns they also included harmful petroleum additives or PTFE. I wanted this keyboard to last for years and the thought of using a lube that might slowly erode the plastic was worrisome. For the white plastic 'hats' and contact points I bought a 2 oz jar of Trident pure silicone grease which is used for diving equipment. The diving community is well-aware of the deteriorating effect of petroleum on plastic/rubber so you can be sure this is the right stuff.
For the internal electronics I left the trimpots alone....and the circuit capacitors are too new to consider replacing so I also left those alone.
RESULTS
I spent a few hours putting everything back together. I used the silicone grease to lube the key's pad and contact points and began reinstalling all the keys, checking the action and height as I went.
Incidentally, each white key is stamped with a number 1-7 (black are 3) to help you reinstall them in order so don't panic if you mix them up. The exceptions are the first two lower white keys which are stamped 00 and 0. The final high key is labeled 8. The result of these mods was a nice smooth key action with consistent feel on every key and sense that this keyboard had been resurrected. What a great keyboard and fun project.
 |
All mods are illustrative only, perform at your own risk.
Datsun is a registered trademark of Nissan®